Doc:2.6/Manual/Animation/Techs/Shape/Shape Keys
目次
Shape Keys
Introduction
- Shape Keys are used on Objects like Mesh, Curve, Surface, Lattice.
- They are used to deform the object vertices into a new shape.

- There are two types of Shape Keys.
- Relative
- Which are relative to the Basis or selected shape key.
- They are mainly used as, for limb joints, muscles, or Facial Animation.
- Absolute
- Which are relative to the previous and next shape key.
- They are mainly used to deform the objects into different shapes over time.
- The shape key data, the deformation of the objects vertices, is usually modified in the 3D View by selecting a shape key, then moving the object vertices to a new position.
Shape Keys Panel
Mode: All modes
Panel: Properties, Object Data, Shape Keys

- Relative
- Set the shape keys to Relative or Absolute.
- Name
- Name of the Shape Key.
- Value
- Current Value of the Shape Key (0.0 to 1.0).
- Mute
- This visually disables the shape key in the 3D view.
- Add
- Add a new shape key to the list.
- Remove
- Remove a shape key from the list.

- Specials
- A menu with some operators.
- Transfer Shape Key
- Transfer the active 'Shape Key' from a different object.
- Select two objects, the active Shape Key is copied to the active object.
- Join as Shapes
- Transfer the 'Current Shape' from a different object.
- Select two objects, the Shape is copied to the active object.
- Mirror Shape Key
- If your mesh is nice and symmetrical, in Object Mode, you can mirror the shape keys on the X axis.
- This wont work unless the mesh vertices are perfectly symmetrical.
- Use the Mesh » Symmetrize function in Edit Mode.
- Mirror Shape Key (Topology)
- This is the same as Mirror Shape Key though it detects the mirrored vertices based on the topology of the mesh.
- The mesh vertices dont have to be perfectly symmetrical for this one to work.
- New Shape From Mix
- Add a new shape key with the current deformed shape of the object.
- Delete All Shapes
- Delete all shape keys.
- Move
- Move shape key up or down in the list.
- Show Active
- Show the shape of the active shape key in the 3D View.
- Show Active is enabled while the object is in Edit Mode, unless the setting below is enabled.
- Edit Mode
- Modify the shape key settings while the object is in Edit mode.
Relative Shape Keys
- Relative shape keys deform from a selected shape key.
- By default all relative shape keys deform from the first shape key called the Basis shape key.

- Clear Weights
- Set all values to 0.
- Name
- Name of the active shape key.
- Value
- Value of the active shape key.
- Range
- Min and Max range of the active shape key value.
- Vertex Group
- Limit the active shape key deformation to a vertex group.
- Relative
- Select the shape key to deform from.
Absolute Shape Keys
- Absolute shape keys deform from the previous and to the next shape key.
- They are mainly used to deform the object into different shapes over time.

- Reset Timing
- Reset the timing for absolute shape keys.
- For example, if you have the shape keys, Basis, Key_1, Key_2, in that order.
- Reset Timing will loop the shapekeys, and set the shape key frames to +0.1.
- Basis 0.1
- Key_1 0.2
- Key_2 0.3
- Evaluation Time will show this as frame*100.
- Basis 10.0
- Key_1 20.0
- Key_2 30.0
- Name
- Name of the active shape key.
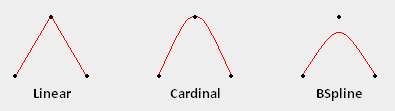
- Interpolation
- This controls the interpolation between shape keys.

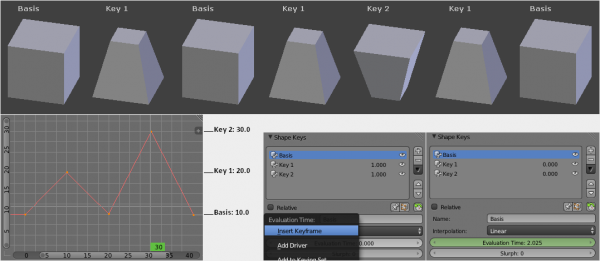
- Evaluation Time
- This is used to control the shape key influence.
- For example, if you have the shape keys, Basis, Key_1, Key_2, in that order,and you reset timing.
- Basis 10.0
- Key_1 20.0
- Key_2 30.0
- You can control the shape key influence with Evaluation Time.
- Here keyframes have been used to control Evaluation Time for animation.

- Slurph
- Quote 2.66 "Create a delay (in frames) in applying key positions, first vertex goes first."
- As far as i can tell this doesnt anything in 2.66. Im not sure what it used to do in 2.4x.
- 2.4 Slurph
Workflow For Relative Shape Keys
- This example shows you how to make a cube mesh transform in to a sphere.
- In Object Mode add two shape keys via the Shape Key Panel.
- Basis is the rest shape. Key 1 will be the new shape.
- With Key 1 selected, switch to Edit Mode.
- Press ⇧ ShiftAltS To Sphere, move the mouse right, then LMB
 .
. - Switch to Object Mode.
- Set the Value for Key 1 to see the transformation between the shape keys.

Workflow For Absolute Shape Keys
- Select the default Cube.
- Switch to Edit Mode.
- Switch to Face Select mode (if you are not already in it)


- Select the top face.
- Extrude up E 1 LMB .

- Select a side face on the top half. (the one at x=1 if possible)
- Extrude out E 1 LMB .
- Switch back to Object Mode.
- Add a basis shape keys and two more via the + button on the Shape Key Panel.
- Uncheck the Relative checkbox.
- Click the Reset Timing button.
- Switch to Edit Mode.
- Select shape key Key 2 to edit the third shape key.
- Select the extruded side face and G Z 1 LMB
- Select shape key Basis to edit the first shape key.
- Select the extruded size face and S 0.5 LMB , then G X -1 LMB .
- Switch to Object Mode.
- Drag the Evaluation Time slider to make its value vary from 10 to 30.

More Details On Absolute Shape Keys
The thing to remember about absolute shape keys is that they are incomplete until you click the Reset Timing button. When you create a shape key its "frame" property is zero (https://developer.blender.org/T39897), which is a completely useless value. This frame value is not displayed on the UI so you can't easily tell if something is wrong or screwy until your animation starts misbehaving.
The number displayed to the right of the key name is the value and is used in relative shape keys. It has no effect on absolute shape keys, so ignore it.
When you reset the timings blender iterates through the shape keys assigning them frame values incrementing by 0.1 from key to key.
| name | frame | evaluation time |
|---|---|---|
| Basis | 0.1 | 10 |
| Key 1 | 0.2 | 20 |
| Key 2 | 0.3 | 30 |
| Key 3 | 0.4 | 40 |
If you delete a shape key this does not automatically alter the frame values assigned to remaining shape keys.
| name | frame | evaluation time |
|---|---|---|
| Basis | 0.1 | 10 |
| Key 1 | 0.2 | 20 |
| Key 3 | 0.4 | 40 |
The Evaluation Time is how you choose which shape key is active, and how active it is. The interesting values range from 10 .. (n*10) where n is the number of shape keys. (assuming you have not deleted or added any keys since the last Reset Timing). If you are using shape keys for animation, 99% of the time you will be putting keyframes on this Evaluation Time field.
Remember: if you are having problems with your absolute shape keys, there is a good chance that you need to Reset Timing.
Shape Key Operators
- 3D View > Edit Mode > Header > Mesh > Vertices > Shape Propagate
- Apply selected vertex locations to all other shape keys.
- 3D View > Edit Mode > Header > Mesh > Vertices > Blend From Shape
- Blend in shape from a shape key.