Doc:2.6/Manual/Animation/Techs/Shape/Shape Keys/Editing
目次
[非表示]Editing Shape Keys
Mode: Object mode
Panel: Shape Keys panel > Object Data context > Properties window
The edition of either relative or absolute shape keys is very similar.
Creating Shape Keys
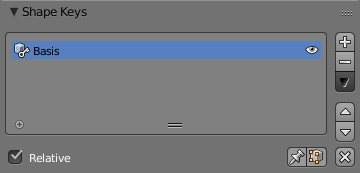
You always create a shape key in Object mode, using the Add Shape Key button of the Shape Keys panel in the Object Data context of Properties window.
It is very important to understand this: when you edit an object with shape keys, you always edit its current active shape. When you add a new shape key, it is just a copy of the current active one. This implies that you must add a shape key first, and then edit it (using the Edit mode, ⇆ Tab).
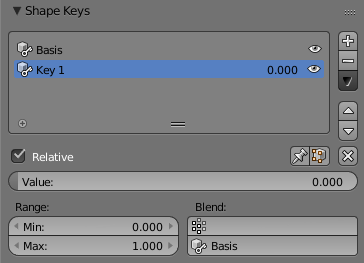
The new shape key, unless it is the first one (called Basis), is named Key n (n being a number) by default. You can rename it (for meshes and lattice only…) by typing a new, more meaningful name in the relevant text field of the Shape Keys panel.
Selecting Shape Keys
Before editing a shape, you must select it.
You can select a shape key in Object mode, using:
- The Graph Editor window, by clicking RMB
 on its colored horizontal line, or selecting (LMB
  click) its corresponding channel.
 - The Shape Keys panel in 3D View window (either cycling between your shapes with the left/right arrows, or directly with the list).
The object will take the shape corresponding to the selected key. Note that as soon as your object has one shape key, there will always be one selected (its name is shown in the bottom left of the 3D views, next to the object’s name).
Editing Shape Keys
Shape keys edition can be split in two main parts: the shape edition itself, and the shape’s properties.
Editing Shape
As already stressed, you always edit the current selected shape key. So you must first select it.
Then:
- enter to Edit mode (⇆ Tab);
- move your vertices/control points to your liking;
- return in Object mode to validate your changes.
This is crucial to understand: all shape keys of an object have the same topology. This means that:
- If you add a vertex/control point, an edge or a face in one shape, it will automatically appear in all other shapes (at exactly the same place, until you edit it).
- If you delete a vertex/control point, an edge or a face in one shape, it will also be deleted in all other shapes.
So, if you modify the topology of a shaped object, you’ll have to edit all its shapes again, especially if you add something.
There are also two editing tools (reserved to meshes, it seems…), available through the Specials menu (W) or in Vertices submenu Mesh menu of the 3D-header, which might help you when editing shape keys:
- Blend From Shape
- This will blend the current selected elements with their state in another shape key.
- Once the tool is activated, you must select (in a settings bottom part of Tool Shelf) from which key you want to blend, and then to what extent you want to blend — from 0.0 to 1.0 by a Blending factor slider.
- For example, if you are editing key
smileand want to recover theBasisstate of the left part of the lips, you would select these vertices, select Blend From Shape, then select the Basis key, and sets value of 1.0 to fully blend them to theBasiskey. - Shape Propagate
- This will propagate to all other shapes the current state of the selected elements. Useful to “reset” all shape keys for only a portion of your object.
Editing Shape Properties
You edit the shape keys’ properties in their panel from the Object Data context in the Shape Keys panel.
The main shape key property is obviously the toggle between relative and absolute keys by the Relative button.
Independently of the shape key type there are the shape properties:
- The name text field
- This is where you can rename your keys.
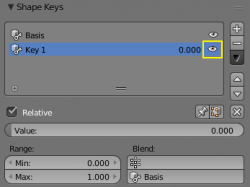
- The “eye” button
- Controls the muting of the current shape key.
- The “plus” and “minus” buttons
- These add and delete respectively the current shape key.
- The “arrow down” button
- Invokes the Specials operators drop-down list.
- The “pin” button
- Controls the pinning of the current shape key.
- The “Apply in Edit mode” button
- For Meshes only. Applies shape keys in edit mode for mesh objects.
You then have options specific to the type of keys:
- Relative keys
-
- The “X” button Clear Weights
- Set all relative keys values to 0.
- Value
- Value of the active shape key.
- Range
- Min and Max range of the active shape key value.
- Blend
-
- Vertex Group
- Limit the active shape key deformation to a vertex group.
- By default, all vertices of the object are affected by the key. If you want to only blend/deform one area of your object, then create a vertex group, and enter its name in the Vertex Group text field – vertices, which aren't belong this group (with a null weight) will never be affected by current shape key (they will remain as in the “selected” key for blending), and the other ones will be affected proportionally to their weight in the group…
- Note that this also allows you to have a static, vertex-level weighting of a shape key, multiplied with its animated influence (which is common to all vertices).
- Shape keys selector for blending
- Opens drop-down list fo select a shape key to blending with the current shape key.
- By default, a relative shape key is blended from the
Basis(first) key. By selecting another key in the drop-down list to the right, you can blend it from this key.
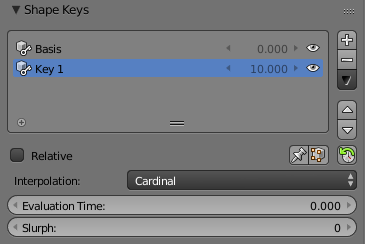
- Absolute keys
-
- Reset Timing
- Reset the timing for absolute shape keys.
- Interpolation
- This controls the interpolation between shape keys:
- BSpline
- Catmull-Rom
- Cardinal (default)
- Linear
- Evaluation Time
- This is used to control the shape key influence.
- Slurph
- This is a time range (in frames) during which the movements of the vertices from one key to the next is spread (the order is the vertices’ one, i.e. first vertex moves first, last vertex moves last).
- This gives a sort of “twisted sliding”, as the vertices do not use the same shape key at the same time…
Deleting Shape Keys
You can delete an active shape key by:
- In the Graph Editor window, deleting the relevant channel (F-curve) (X).
- In the Shape Keys panel, clicking on the “-” button to the side of the panel.
Muting
You can also mute relative shape keys, to make them never affect your object.
To mute a key, select it, and disable the “eye” button near right the “name” one, in the Shape Keys panel.
Note that:
- Absolute shape keys are mutable only if they are already pinned.
- The already muted shape keys don't have any effect with pin.
Pinning
When a object does not have a pinned key, it can show multiple keys at once, and with various influence levels.
To prevent this, click on the “pin” button in the Shape Keys panel. The current object is now locked at that shape key, and will only show that key. This feature is useful when multiple keys are affecting an object and you would like to see the effect of a specific one.
An other use for pinning is to create a shape gallery (i.e. have simultaneously a representation of each shape key). Blender allows the creation of linked duplicates of an object (AltD), which share underlying data (e.g. mesh and shape key data). Once a duplicate has been created, move it to a different area of the screen and pin it to a shape key. Reselect the “original” object, and repeat the process for each shape key. You’ll get a shape gallery (which also helps in editing keys).


