Doc:2.6/Manual/Composite Nodes/Types/Matte
Page status (reviewing guidelines)
Text
needs verification that it's up to date with 2.6
|
Composite Matte Nodes
These nodes give you the essential tools for working with blue-screen or green-screen footage, where live action is shot in front of a blue or green backdrop for replacement by a matte painting or virtual background.
In general, hook up these nodes to a viewer, set your UV/Image Editor to show the viewer node, and play with the sliders in real-time using a sample image from the footage, to get the settings right. In some cases, small adjustments can eliminate artifacts or foreground image degredation. For example, taking out too much green can result in foreground actors looking 'flat' or blueish/purplish.
You can and should chain these nodes together, refining your color correction in successive refinements, using each node's strengths to operate on the previous node's output. There is no "one stop shopping" or one "does-it-all" node; they work best in combination.
Usually, green screen is shot in a stage with consistent lighting from shot to shot, so the same settings will work across multiple shots of raw footage. Footage shot outside under varying lighting conditions (and wind blowing the background) will complicate matters and mandate lower falloff values.
Garbage Matte
Garbage matte is not a node, but a technique where the foreground is outlined using a closed curve (bezier or nurbs). Only the area within the curve is processed using these matte nodes; everything else is garbage and thus discarded.
|
Difference Key Node
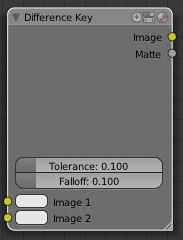
The difference key node determines how different each channel is from the given key in the selected color space. If the differences are below a user defined threshold then the pixel is considered transparent. Difference matting does not rely on a certain background color, but can have less than optimal results if there is a significant amount of background color in the foreground object.
There are two inputs to this node.
- The first is an input Image that is to be keyed.
- The Key Color can be input as an RGB value or selected using the color picker by clicking on the Key Color box to bring up the color dialog, then clicking on the eye dropper tool and selecting a color.
The selectable color spaces are RGB (default), HSV, YUV, and YCbCr.
You can adjust the tolerance of each color in the colorspace individually so that you can have more red variance or blue variance in what you would allow to be transparent. I find that about 0.15 (or 15%) is plenty of variance if the background is evenly lit. Any more unevenness and you risk cutting into the foreground image.
When the Falloff value is high, pixels that are close to the Key Color are more transparent than pixels that are not as close to the Key Color (but still considered close enough to be keyed). When the Falloff value is low, it does not matter how close the pixel color (Image) is to the Key Color, it is transparent.
The outputs of this node are the Image with an alpha channel adjusted for the keyed selection and a black and white Matte (i.e the alpha mask).
Simple Example
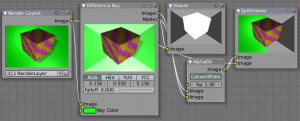
In the example to the right (click to expand), we have a purple cube with yellow marbeling in front of a very unevenly lit green screen. We start building our noodle by threading the image to a difference key, and using the eyedropper, pick a key color very close to the edge of the cube, around where the halo is at the corner on the left-hand side; a fairly bright green. We thread two viewers from the output sockets so we can see what (if anything) the node is doing. We add an AlphaOver node, threading the Matte to the TOP socket and the image to the BOTTOM socket. Very Important, because 0 time blue is not the same as blue times zero. You always want your mask to go to the top socket of the AlphaOver. Premultiply is set and a full multiply is on so that we completely remove the green. In this example, we thread the output of the alphaover to a SplitViewer node so we can compare our results; the original is threaded to the bottom input of the SplitViewer, so that original is on the left, processed is on the right.
We set our variance to .15, and see what we get. What we get (not shown) is a matte that masks around the cube, but not on the right and around the edges where the green is darker; that shade it is too far away from our key color. So, since it is the green that is varying that we want to remove, we increase the Green variation to 1.00 (not shown). Whoa! All the Green disappears (all green within a 100% variation of our green key color is all the green), along with the top of the box! Not good. So, we start decreasing the green until we settle on 55% (shown).
Chaining Example
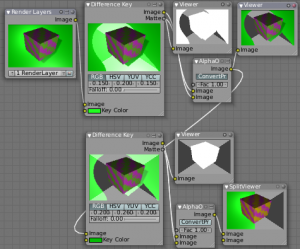
We pay out the wazoo for our highly talented (and egotistical I might add) Mr. Cube to come into the studio and do a few takes. We told him NOT to wear a green tie, but when we look at our footage, lo and behold, there he is with a green striped tie on. When we use our simple noodle, the green stripes on his tie go alpha, and the beach background shows through. So, we call him up and, too late, he's on his way back to Santa Monica and it wasn't in his contract and it wasn't his fault, after all, we're supposed to have all this fancy postpro software yada yada and he hangs up. Geez, these actors.
So, we chain two Difference Key nodes as shown to the right, and problem solved. What we did was lower the variation percentage on the first to remove some of the green, then threaded that to a second (lower) difference key, where we sampled the green more toward the shadow side and outside edge. By keeping both variations low, none of the green in his tie is affected; that shade is outside the key's +/- variation tolerances.
Chroma Key Node
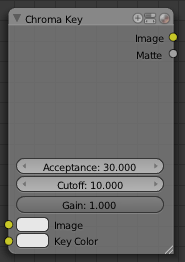
The Chroma Key node determines if a pixel is foreground or background (and thereby should be transparent) based on its chroma values. This is useful for compositing images that have been shot in front of a green or blue screen.
There is one input to this node, the Image that is to be keyed.
Control this node using:
- Green / Blue buttons
- Basic selection of what color the background is supposed to be.
- Cb Slope and Cr Slope (chroma channel) sliders
- Determines how quickly the processed pixel values go from background to foreground, much like falloff.
- Cb Pos and Cr Pos sliders
- Determines where the processing transition point for foreground and background is in the respective channel.
- Threshold
- Determines if additional detail is added to the pixel if it is transparent. This is useful for pulling shadows from an image even if they are in the green screen area.
- Alpha threshold
- The setting that determines the tolerance of pixels that should be considered transparent after they have been processed. A low value means that only pixels that are considered totally transparent will be transparent, a high value means that pixels that are mostly transparent will be considered transparent.
The outputs of this node are the Image with an alpha channel adjusted for the keyed selection and a black and white Matte (i.e the alpha mask).
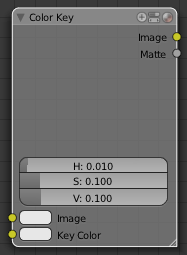
Color Key
The color key node creates a matte based on a specified color of the input image. The sliders represent threshold values for Hue, Saturation, and Value. Higher values in this node's context mean a wider range of colors from the specified will be added to the matte.
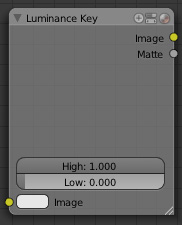
Luminance Key Node
The Luminance Key node determines background objects from foreground objects by the difference in the luminance (brightness) levels. For example, this is useful when compositing stock footage of explosions (very bright) which are normally shot against a solid, dark background.
There is one input to this node, the Image that is to be keyed.
Control this node using:
- The High value selector determines the lowest values that are considered foreground. (which is supposed to be - relatively - light: from this value to 1.0).
- The Low value selector determines the hightes values that are considered to be background objects. (which is supposed to be - relatively - dark: from 0.0 to this value).
It is possible to have a separation between the two values to allow for a gradient of transparency between foreground and background objects.
The outputs of this node are the Image with an alpha channel adjusted for the keyed selection and a black and white Matte (i.e the alpha mask).
Example
For this example, let's throw you a ringer. Here, the model was shot against a white background. Using the Luminance Key node, we get a matte out where the background is white, and the model is black; the opposite of what we want. If we wanted to use the matte, we have to switch the white and the black. How to do this? ColorRamp to the rescue - we set the left color White Alpha 1.0, and the right color to be Black Alpha 0.0. Thus, when the Colorramp gets in black, it spits out white, and vice versa. The reversed mask is shown; her white outline is useable as an alpha mask now.
Now to mix, we don't really need the AlphaOver node; we can just use the mask as our Factor input. In this kinda weird case, we can use the matte directly; we just switch the input nodes. As you can see, since the matte is white (1.0) where we don't want to use the model picture, we feed the background photo to the bottom socket (recall the mix node uses the top socket where the factor is 0.0, and the bottom socket where the factor is 1.0). Feeding our original photo into the top socket means it will be used where the Luminance Key node has spit out Black. Voila, our model is teleported from Atlanta to aboard a cruise ship docked in Miami.
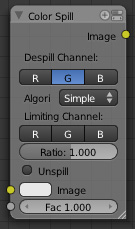
Color Spill Node
The Color Spill node reduces one of the RGB channels so that it is not greater than any of the others. This is common when compositing images that were shot in front of a green or blue screen. In some cases, if the foreground object is reflective, it will show the green or blue color; that color has "spilled" onto the foreground object. If there is light from the side or back, and the foreground actor is wearing white, it is possible to get "spill" green (or blue) light from the background onto the foreground objects, coloring them with a tinge of green or blue. To remove the green (or blue) light, you use this fancy node.
There is one input to this node, the Image to be processed.
The Enhance slider allows you to reduce the selected channel's input to the image greater than the color spill algorithm normally allows. This is useful for exceptionally high amounts of color spill.
The outputs of this node are the image with the corrected channels.
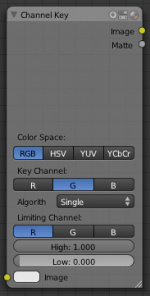
Channel Key Node
The Channel Key node determines background objects from foreground objects by the difference in the selected channel's levels. For example in YUV color space, this is useful when compositing stock footage of explosions (very bright) which are normally shot against a solid, dark background.
There is one input to this node, the Image that is to be keyed.
Control this node using:
- Color Space buttons selects what color space the channels will represent.
- Channel buttons selects the channel to use to determine the matte.
- High value selector determines the lowest values that are considered foreground. (which is supposed to be - relatively - height values: from this value to 1.0).
- Low value selector determines the highest values that are considered to be background objects. (which is supposed to be - relatively - low values: from 0.0 to this value).
It is possible to have a separation between the two values to allow for a gradient of transparency between foreground and background objects.
The outputs of this node are the Image with an alpha channel adjusted for the keyed selection and a black and white Matte (i.e the alpha mask).
Distance Key
...
