「利用者:Fade/Doc:2.6/Manual/Interface/Window system」の版間の差分
(→The Window System) |
細 (1版 をインポートしました) |
(相違点なし)
| |
2018年6月29日 (金) 05:46時点における最新版
The Window System
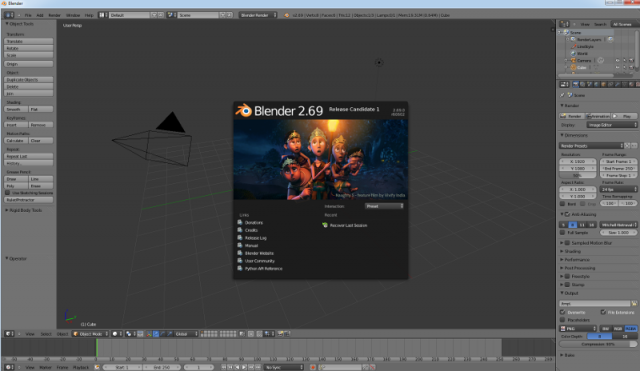
When you start Blender you should a screen similar to this (the splash screen in the center will change with new versions):
In the center of the window is the splash screen. This gives quick and easy access to recently opened Blender files. If you want to start work on a new file just click outside of the splash screen. The splash screen will disappear revealing the default layout and cube.
Every window you see can be further broken down into separate areas (as described in the section on arranging frames). The default scene is described below.
The default scene
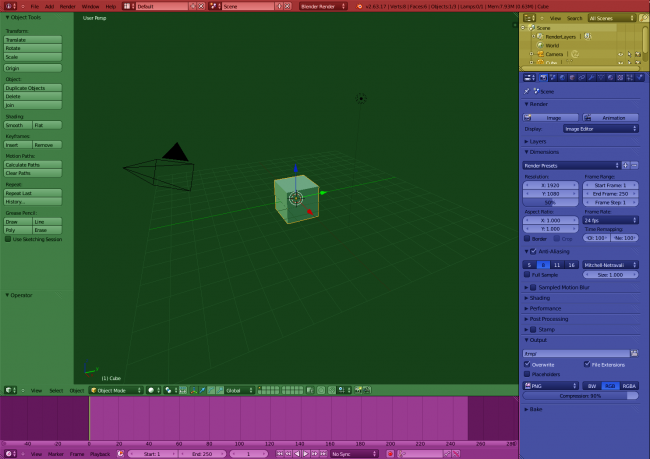
The default scene is separated into five windows and is loaded each time you start Blender or a new file. The five windows are:
- The Info window (shaded red) at the top. The Info window is comprised solely of a header.
- A large 3D window (3D View) (shaded green).
- A Timeline window at the bottom (shaded purple).
- An Outliner window at the top right (shaded yellow).
- A Properties window (Buttons window) at the bottom right (shaded blue).
As an introduction we will cover a few of the basic elements.
The Info Window is found at the top of the Default Scene and has the following components:
- Window/Editor Type Selector: The red shaded area allows you to change the Window/Editor Type. This region is found on every Window.
- Menu options: The dark blue shaded area provides access to the main menu options.
- Current Screen (default is Default): The green shaded area allows you to select different Screens. By default, Blender comes with several pre-configured Screens for you to choose from. If you need custom screen layouts, you can create and name them.
- Current Scene: The yellow shaded area allows you to select different Scenes. Having multiple Scenes allows you to work with separate virtual environments, with completely separate data, or with objects and/or mesh data linked between them. (In some 3D packages, each file contains one scene, while in Blender, one .blend file may contain several scenes).
- Current Rendering Engine: The purple shaded area gives a list of available rendering engines.
- Resource Information: The aqua shaded area gives you information about Blender and system resources in use. This region will tell you how much memory is being consumed based on the number of vertices, faces and objects in the selected scene, as well as totals of what resources are currently selected. This can help identify when you are reaching the limits of your hardware.
3D Window View
- 3D Cursor: Can have multiple functions. For example, it represents where new objects appear when they are first created, or it can represent where the center of a rotation will be.
- 3D Transform Manipulator: Is a visual aid in transforming objects (grab/move, rotate and scale). Objects can also be transformed using the keyboard shortcuts: (G/R/S); CtrlSpace will toggle the manipulator visibility.
- Cube Mesh: By default, a new installation of Blender will always start with a Cube Mesh sitting in the center of Global 3D space (in the picture above, it has been moved). After a while, you will most likely want to change the "Default" settings; This is done by configuring Blender as you would want it on startup and then saving it as the "Default" using CtrlU (Save Default Settings).
- Light (of type Lamp): By default, a new installation of Blender will always start with a Light source positioned somewhere close to the centre of Global 3D space.
- Camera: By default, a new installation of Blender will always start with a Camera positioned somewhere close to the centre of Global 3D space and facing it.
3D Window Header
This is the header for the 3D window. All windows in Blender have a header, although in some cases they may be located at bottom of the window.
Read more about Blender headers »
- Window/Editor Type Selector: Allows you to change the type of Window. This option can be found in every window header. For example, if you want to see the Outliner window you would click and select it.
- 3D Transform manipulator options: Access to the manipulator widget is also possible by clicking the coordinate system icon on the toolbar. The translation/rotation/scale manipulators can be displayed by clicking each of the three icons to the right of the coordinate system icon. ⇧ ShiftLMB
 -clicking an icon will add/remove each manipulator's visibility.
- Viewport shading: Blender renders the 3D window using OpenGL. You can select the type of Viewport shading that takes place by clicking this button and selecting from a variety of shading styles including simple boudning boxes and complex textures. It is recommended that you have a powerful graphics card if you are going to use the Textured style.
- Layers: Blender Layers are provided to help distribute your objects into functional groups. For example, one layer may contain a water object and another layer may contain trees, or one layer may contain cameras and lights. To de-clutter the view you can turn layers on and off.
Buttons (Properties) Window Header
The Properties window displays panels of functions. Panels that contain similar functions are grouped e.g. all of the rendering options are grouped. In the header of the Properties Windows is a row of buttons (called Context Buttons) that allow you to select which group of panels are shown. Some panels are only visible when particular Objects are selected. Panels can be collapsed by use of the small arrow left of the panel title (e.g. besides Render) and may be rearranged by dragging the top right corner.
Outliner Window
This window lists all the objects in a scene and can be very useful when working with larger scenes with lots of items. You can choose what types of elements and how they are displayed in the header.
Timeline Window
This window gives a timeline, through which you can scrub with the LMB ![]() .
.

