Doc:2.6/Manual/3D interaction/Transformations/Basics/Grab
Page status (reviewing guidelines)
Page reviewed and in good shape |
Grab/Move
Mode: Object Mode, Edit Mode, and Pose Mode for the 3D View; UV/Image Editor Tools, Sequence Editor, Dopesheet, and Graph Editor for other specific types of Grab/Move operations.
Hotkey: G or combinations for specific Axis constraint
Menu: Context Sensitive, Object Based → Transform → Grab/Move
This option lets you translate your Objects when in Object Mode, or the elements that are used in the Object construction in the 3D space of the active 3D Viewport.It offers similar functionality in various other editor environments like Node editor, Graph editor, UV editor, Sequencer etc. Further details of the option will be discussed in the related sections in detail.
While translating, the amount of change in the co-ordinates is displayed at the bottom left corner of the 3D view window.
3D View
There are 2 types of Grab/Move options in the 3D View:
- Using shortcuts and combinations of shortcuts.
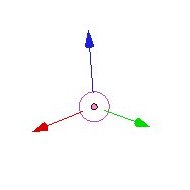
- Using the Transform Widget helper, when you choose the Translation Widget in the header of the 3DView.
Transform Widget
In the default installation of Blender, this is the Transform Widget active by default. You can access this option by click holding LMB ![]() and dragging the 3D translatation widget in the 3D view itself.
and dragging the 3D translatation widget in the 3D view itself.
Shortcuts in the 3D View
One of the fastest ways to move things in 3D space is with G. Pressing this hotkey will enter the “grab/move” transformation mode, where the selected object or data is moved freely, according to the mouse pointer’s location. Using combinations of this shortcut with specifc shortcuts to specify a chosen axis, will give you full control over your transformation
- MMB

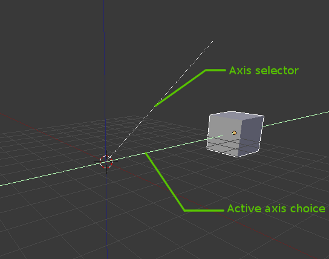
- Constrain the move to the X, Y or Z axis automatically, according to the position of the mouse pointer in the 3D View. After pressing the G key, if the MMB
 is pressed, a visual option to constrain the translation will be available, showing the three axis in the 3D View space. The axis of choice to confirm the operation, will depend on the axis about which the MMB
  is released. At any point during th eoperation, the chosen axis can be changed by hitting X, Y, Z on the keyboard.
- Alt + g
- Clears all the previously done transformation on the object.Works only in Object Mode.
- ⇧ Shift and XYZ
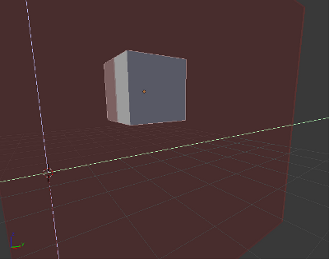
- Complementary axis transformation constraint. With this option, we can isolate the transformation to axis complementary to the choosen axis. When a specific axis is choosen, the translation will occur in all axes other than the chooosen one. This can be seen in the example image
Controling Grab/Move Precision
In addition to the Axis constraint options listed above, Blender offer some options to limit the amount of the transformation in small or predefined steps.
- ⇧ Shift
- Slow transformation option. While still in the grab mode i.e.,after G pressed, if the ⇧ Shift key is pressed, the rate of transformation is reduced giving you precise translation.
- Ctrl
- Snap while grabbing the object based on the snapping constraint which has been already set. For this option you may not necessarily enable the snap option. It will work from the snap disabled mode itself.
- Ctrl+⇧ Shift
- Intuitively this is the combination of the Ctrl and the ⇧ Shift operations individually. This option will move the object with high precission along with the snapping constraint.
- X/y/z + <decimal number>
- This option will limit the transformation to the specified axis and the decimal number specified will be the magnitude of the translation along that axis. This decimal number which is being entered will be displayed at the bottom left corner of the 3D view window. Hitting backspace during the number entry will remove the numerical specification option but the object will be in the same axis.The number can be retyped to specify the translation.At any point of time, axis can be changed by hitting x/y/z key. You can also use this to move to a specific location or increase distance for the object location.
Orientations
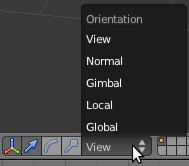
There are 5 orientations for all tranformations.
- Global(default)
- Local
- Normal
- Gimbal
- View
Read more about transform orientations Here
Each mode is a co-ordinate system in which the transformations can be carried out. These orientations can be chosen from the pop up menu just by the side of transformation manipulator choice widget group.
- G key followed by Xx or Yy or Zz will directly allow you to translate the objects in local axis. Of course this can also be followed by numerical specification of the displacement of entity.
- Similar to above operation, G key followed by ⇧ Shift and Xx or Yy or Zz will directly allow you to translate the objects in local axis complementary to the one specified.
Other Editor Windows
For the other Editor Windows, like UV/Image Editor Tools, Sequence Editor, Dopesheet, and Graph Editor, the Grab/Move Operations are used to move Objects or elements based in their context, but, differently from the 3D View, you will see only two axis, X and Y normally, and altough we are explainning the Grab/Move in the 3D Interaction section, those Objects and elements are shown in a 3D Interface. Blender will simply constrain the movement of a third possible axis. Most of the shortcuts used in the 3D View, are also used when interacting with those Editor Windows. This is also true for all of the other transformations, like rotate and scale.
Python Scripting
You can also use Python Scripting in Blender to Grab/Move Objects or elements to a specific location, either using the Python interactive console, or running a Python script in the Text Editor Window.
- Getting the location vector for current object
- bpy.context.scene.objects.active.location
Returns you the location vector for the active object in the scene.One can assign a different value to the location vector to change the position of the object.
- Operator for translating active object and its syntax
- bpy.ops.transform.translate(value=(<DX>, <DY>, <DZ>), constraint_axis=(<bool>, <bool>,<bool>), constraint_orientation='<ORIENTATION NAME>', mirror=<bool>, proportional='<ENABLE?DISABLE>', proportional_edit_falloff='<FALLOFF TYPE>', proportional_size=<INT>, snap=<bool>, snap_target='<SNAP TARGET>', snap_point=<x,y,z>, snap_align=<bool>, snap_normal=<x,y,z>, texture_space=<bool>, release_confirm=<bool>)
Hints
- Moving object in Object mode is clearly different from moving the object by selecting all its vertices/edges/faces in Edit mode. Doing this can lead to disturbed Center of Transformation for the given object.
- If G+x/y/z is used in non global orientations, it won't confine the translation to x axis in that orientation but to the global X axis orientation only


