Extensions:2.6/Py/Scripts/Neuro tool/import
| UI location | Properties » Scene » Import Objects | ||
|---|---|---|---|
| Version | 1.2.2 | Author(s) | Corrado Calì, Diego Marcos, Biagio Nigro, Anne Jorstad |
| Blender | 2.68-2.76 | License | GPL |
| File name | NeuroMorph_Import_Objects.py |
|---|---|
| Current version download | https://github.com/ajorstad/NeuroMorph |
OVERVIEW
This module is used to import one or many object models from .obj files obtained through 3D image segmentation software (e.g. ilastik, www.ilastik.org or TrakEM2, www.ini.uzh.ch/~acardona/trakem2.html) into Blender, for use with the other NeuroMorph tools.
The import procedure allows the objects to be remeshed and rescaled according to user needs. Remeshing can smooth and downsample an input mesh, making it more manageable for real-time operations. The rescaling ensures that the Blender units corresponds to the correct measurement scale, which in the intended application is usually microns.
The use of this module is not required to use the rest of the NeuroMorph toolkit. However, its use ensures appropriate mesh scaling which is important for obtaining measurements in the correct units and for correctly overlying images from the original image stack onto the imported mesh objects.
DESCRIPTION
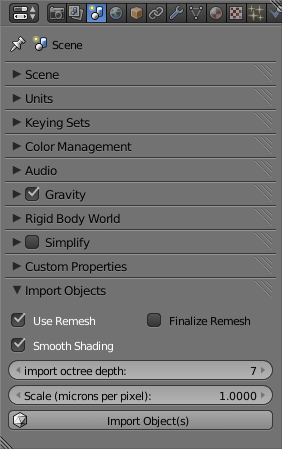
The script inserts a panel called "Import Objects" into the Scene context of the Properties panel (![]() at the bottom right of the Blender interface). The user is then able to define settings appropriate for the specific .obj files to be imported.
at the bottom right of the Blender interface). The user is then able to define settings appropriate for the specific .obj files to be imported.
Interface Overview
- Use Remesh: Apply Blender's remesh modifier to the objects on import. (If unselected, no changes will be made to the objects on import.)
- Smooth Shading: Smooth the output faces (recommended).
- Finalize Remesh: Apply the remesh modifier without first allowing the user to inspect and adjust the output. Recommended to leave unchecked when first testing import options. If left unchecked, the user must go to the "Modifiers" context tab (
 ) after the initial import to adjust and finalize the remesh operation.
- import octree depth: Controls the "Remesh resolution" parameter, which sets the resolution of the meshes. Small values lower the number of polygons defining the mesh surfaces, higher values generate denser meshes by better preserving the object shape details and increasing memory allocation.
- Scale (microns per pixel): Each mesh will be rescaled according to this scale factor, so that Blender units are equivalent to microns, if applicable. This is relevant if segmentation software such as ilastik or Fiji has been used to generate the mesh objects.
- Import Object(s): Navigate to the appropriate folder and select one or many .obj files to be imported. The upload procedure can take several minutes depending on the size and the number of files being imported.
INSTRUCTIONS FOR IMPORTING OBJ FILES
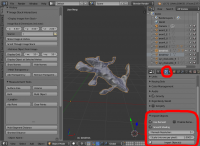
1. Under the 'Scene' context tab (![]() as shown in the image above), find the 'Import Objects' tool at the bottom.
as shown in the image above), find the 'Import Objects' tool at the bottom.
2. Select the 'Use Remesh' box, and the 'Smooth Shading' box, and set the 'Remesh Resolution' setting to 7 (as shown in the image above); leave 'Finalize Remesh' unchecked.
3. If the software you have used to make a model has saved its size (in microns) then leave the 'Scale (microns per pixel)' at 1.000. If the size of the models was not specified in the reconstruction software, give the pixel size here. For the sample obj. files provided, the models were made in ilastik from the images that had a pixel size of 0.01167 microns, so enter this value as the scale.
4. Click on 'Import Objects', navigate to the desired .obj file, and then click 'Import' in this window.
5. After a few seconds the mesh (which is a dendrite in the provided examples) will appear in the 3D window.
6. Click on the 'Modifiers' context tab (![]() ) to finalize the Remesh (if 'Finalize Remesh' was left unchecked on import). From here the 'Octree Depth' can be adjusted to suit the specific application and objects being imported. When the parameters look acceptable, click 'Apply' finalize the Remesh.
) to finalize the Remesh (if 'Finalize Remesh' was left unchecked on import). From here the 'Octree Depth' can be adjusted to suit the specific application and objects being imported. When the parameters look acceptable, click 'Apply' finalize the Remesh.
Additional Information
To obtain meaningful measurements from NeuroMorph, lengths must correspond to known units. In the following page we explain how to obtain the correct rescaling of imported meshes within Blender, by presetting measurement units in the segmentation-reconstruction software used to obtain the original meshes.


