Extensions:2.6/Py/Scripts/System/Gyes/History-Tool
< Extensions:2.6 | Py | Scripts | System | Gyes
Links : Gyes , RTG , RMG
History Tool
A blender scene can contain loads and loads of material , also both RMG (Random Material Generator) and RTG ( Random Texture Generator can create thousands of materials and textures in a few minutes that may result and in avery long list of bleder data that can become cumbersome to manage , if not impossible. History tool offers exactly that, a neat , fast and logical way to organize your materials and textures into "Histories" or just group them .
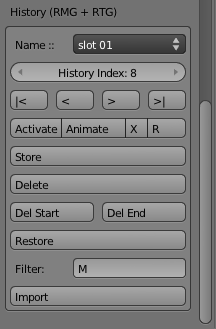
- Name - You choose here which slot from history you want to use. A slot is a history by itself , or you can think of it as a group of blender data ( materials / textures)
- History Index - Each material stored in history slot is stored inside an index. This index is nothing more than the location of the material inside the history slot. Think of it as a top 10 chart with one big difference, that a history slot can have unlimited indicees and thus store unlimited amount of materials. What is stored in index is not blender data themselves but only the name of the material. You can use the arrows in the sides of the number to change the index without activation .
- I< - Change to the 1st index (always index 1) and activate it.
- < - Change to the previous index and activate it.
- > - Change to the next index and activate it.
- >I - Change to the last stored index and activate it.
- Activate - Assign the specific material to the selected object / objects. This button is disabled if the history index is empty.
- Animate - Insert a keyframe for every randomized material value. Animate is very useful for when you create a material that randomly animates between values , for example a material that changes color and transparency from frame 1 to frame 100. Instead of manually inserting keyframes for every material value randomized this button does this for you automatically. Just choose your frame, and click animate to insert the keyframe. The material does not need to be randomized or stored to history for this to work.
- X - Does the exactly opposite of Animate. It removes all keyframes for material values. Caution should be exercised here cause it will remove any keyframe associated with the material ignoring whether it was inserted via animate or you manually.
- R - This is a random assigner. What is does is to take all the history indices and randomly assign them to the selected objects.This is very useful when you have a group of objects that you want each object to be assigned of a specific amount of available materials. For example a floor of tiles, or maybe candles of different colors. This works with one object or multiple objects selected.
- Store - Store the name of the material to the current slot and history index. This button will be disabled if you are not on the first empty index. This happens in order to not allow for gaps in history..
- Delete - Deletes the content of the index but not the index itself. What it does is to shift all next material names to one previous indices. This way your history does not have any gaps. The button wont be available if you are currently on an empty index.
- Del Start - It does not delete only defines the start of deletion. Think of it as the start of the drag of a selection box. By default is set to the first index (index 1).
- Del End - It defines the end of deletion and deletes any index between Del Start and Del End. Very useful if you want to delete many indices at once.
- Restore - Restore actually loads history that is saved with the blend file, this way you never loose your history when you exit blender. Saving history is done automatically when you save a blend file as history slots become part of your scene properties. I tried to make load automatic too, but unfortunately I have not been successful yet.
- Filter - This is a box where you can type some text inside. This text is then used by the import button to filter which material is stored to your history. If this is empty then it will import all available materials. Bare in mind that capitalization matters so "M" is different to "m". You don't need to insert the whole name of the material even a partial match will work.
- Import - Import all materials matching the text in the Filter box , to history. The import stores the materials to history starting from the currently selected history slot and first empty index. Of course you can store imported materials to different slots for better organization.
Its important to note here that the History Tool works exactly the same in RMG (Random Material Generator) and RTG ( Random Texture Generator . Actually in both cases is the same tool. And it will work for material nodes and texture nodes.
