「Doc:2.6/Reference/Textures/UV Image Editor」の版間の差分
(Created page with "= The UV/Image Editor for texturing= thumb|right|600px|UV/Image Editor window for texturing The UV/Image Editor is w...") |
細 (1版 をインポートしました) |
(相違点なし)
| |
2018年6月29日 (金) 06:08時点における最新版
目次
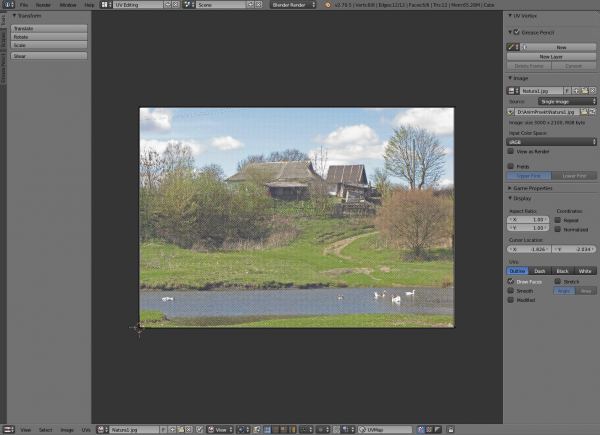
The UV/Image Editor for texturing
The UV/Image Editor is where you will be editing the UVs. This is an overview of the tools found there. Using the UV editor is explained more in depth in the next sections.
Header Bar
The header bar contains several menus and options for working with UVs
- View menu
- Tools for Navigating, working with the editor and controlling how things are displayed. The properties panel has display options and manipulation tools. When an image is being used, image properties are displayed. The Scopes panel is used when working with Images. It contains different image visualizers
- Select menu
- Tools for Selecting UVs.
- Image menu
- This contains options for when Working with Images and Painting Textures.
- UVs menu
- Contains tools for Unwrapping Meshes and Editing Uvs.
 Image Selector Menu
- Select the image to apply when Working with Images.
 Pin Image
- Displays current image regardless of selected object.
 Pivot Point Selector
- Similar to working with Pivot Points in the 3D view.
 Sync Selection
- Keeps UV and Mesh component selections in sync.
 Selection Modes
- Vertex
- Edge
- Face
- Island
 Sticky Selection Mode
- When Sync Selection is disabled, these options control how UVs are selected.
 Proportional Editing
- Works like Proportional Editing in the 3d view
 UV Snapping
- Similar to Snapping in the 3D View
 Active UV Texture Map Selector
- Select which UV texture to use
 Image Channels to Draw
- Set the image to be displayed with Color, Color and Alpha, or just Alpha.
 Auto Update Other Affected Windows
- Update other affected windows space automatically to reflect changes during interactive operations such as transfom.
Properties Panel
- UV Vertex
- Transform Properties for select UVs
- Grease Pencil
- Similar to Grease Pencil in the 3d view.
- Image
- Contains the properties of the current Image
- Display
- Controls display options for UVs and additional settings for when Working with Images.
Display Options
You can set how UVs are displayed in the Display Panel:
- Aspect Ratio
- Display Aspect for this image. Does not affect rendering.
- Coordinates
- Display UV coordinates
- Repeat
- Draw the image repeated outside of the main view.
- Normalized
- Display UV coordinates from 0.0 to 1.0 rather then in pixels
- Cursor Location
- 2D cursor location for this view
- Outline/Dash/Black/White
- Sets how UV edges are displayed
- Draw Faces
- Draw faces over the image
- Smooth
- Makes edges appeared Antialiased
- Modified
- Show results of modifiers in the UV display
- Stretch
- Shows how much of a difference there is between UV coordinates and 3D coordinates. Blue means low distortion, while Red means high distortion. Choose to display the distortion of Angles or the Area.
Panning can be done by clicking the MMB ![]() and dragging.
and dragging.
Zooming can be done by scrolling MMB ![]() up or down. Also, as in the 3D view, you can use + NumPad or - NumPad to zoom.
up or down. Also, as in the 3D view, you can use + NumPad or - NumPad to zoom.
The following shortcuts are available, and through the View Menu:
- Zoom 1:8 8 NumPad
- Zoom 1:4 4 NumPad
- Zoom 1:2 2 NumPad
- Zoom 1:1 1 NumPad
- Zoom 2:1 ⇧ Shift2 NumPad
- Zoom 4:1 ⇧ Shift4 NumPad
- Zoom 8:1 ⇧ Shift8 NumPad
- View All ↖ Home
- View Center . NumPad

