利用者:Jaredr122/Doc:2.6/Manual/Modeling/Curves/Editing
目次
- 1 Curve Editing
- 1.1 Creating Curves
- 1.2 Curve Display
- 1.3 Basic Curve Editing (translation, rotation, scale)
- 1.4 Snapping
- 1.5 Deforming Tools
- 1.6 Mirror
- 1.7 Set Bézier Handle Type
- 1.8 Extending Curves
- 1.9 Subdivision
- 1.10 Duplication
- 1.11 Joining Curve Segments
- 1.12 Separating Curves
- 1.13 Deleting Elements
- 1.14 Opening and Closing a Curve
- 1.15 Switch Direction
- 1.16 Converting Tools
- 1.17 Curve Parenting
- 1.18 Hooks
- 1.19 Set Goal Weight
Curve Editing
This page covers the basics of curve editing – more advanced topics, like extrusion (and bevel and taper), are addressed in the next sections:Curve Deform and Extruding
Creating Curves
Blender has five different curve primitives, two Bézier and three NURBS:
- Bezier Curve
- adds an open 2D Bézier curve with two control points.
- Bezier Circle
- adds a closed, circle-shaped 2D Bézier curve (made of four control points).
- NURBS Curve
- adds an open 2D NURBS curve, with four control points, with Uniform knots.
- NURBS Circle
- adds a closed, circle-shaped 2D NURBS curve (made of height control points).
- Path
- adds a NURBS open 3D curve made of five aligned control points, and with Endpoint knots and the CurvePath setting enabled.
Curve Display
Display Options
When in edit mode, the properties window contains options under Curve Display for how curves are displayed in the 3d viewport.
- Handles
- Toggles the display of Bezier handles while in edit moe. This does not affect the appearance of the curve itself. See Curves for more about handle types.
- Normals
- Toggles the display of Curve Normals.
- Normal Size
- Sets the display scale of curve normals. Not that this is relative to the control point scale which can be explicitly set, and is reflected in the normals as well.
Hiding Elements
As in Object mode, you can hide what is selected, and then reveal what was hidden. This is very handy to clean up a bit your views, when you are working on a complex model with thousands of vertices…
To hide, use CtrlAltH, the Hide button of the Curve Tools1 panel, or use the Curve » Show/Hide Control Points » Hide Selected menu option.
To reveal what was hidden, use AltH, the Reveal button of the Curve Tools1 panel, or the relevant option in the same Curve » Show/Hide Control Points menu.
Basic Curve Editing (translation, rotation, scale)
Mode: Edit mode
Hotkey: G/R/S
Menu: Curve » Transform » Grab/Move, Rotate, Scale, …
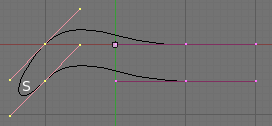
Once you have a selection of one or more control points, you can grab/move (G), rotate (R) or scale (S) them, like many other things in Blender, as described in the Manipulation in 3D Space section.
Note that Bézier control points contain three vertices (the central one and the two handles), so a whole selected control point is equivalent to three selected vertices for transform tools (i.e. you can rotate and scale it, unlike standard mesh or NURBS vertices).
Note that in general, Bézier curves are easier to edit than NURBS, as when you modify a control point, you only affect the two curve segments on both side of the point. With NURBS, when you move a vertex, the curve can be modified up to three point on both side, depending on the order of the curve… Moreover, a Bézier curve always pass through the center of all its control points – NURBS are far from being so simple!
You also have in Edit mode an extra option when using these basic manipulations: the proportional editing.
Snapping
Mode: Edit mode
Panel: Curve Tools1 (Editing context)
Mesh snapping also works with curve components.
Both control points and their handles will be affected by snapping, except for within itself (other components of the active curve).
Snapping works with 2D curves, however points will be constrained to the curve's local XY axis.
Deforming Tools
Mode: Edit mode
Menu: Curve » Transform
The To Sphere, Shear, Wrap and Push/Pull transform tools are described in the Manipulation in 3D chapter.
The two other tools, Tilt and Shrink/Fatten Radius are related to Curve Extrusion.
Smoothing
Mode: Edit mode
Hotkey: W » smooth
Curve smoothing is available through the specials menu. For Bezier curves, this smoothing operation currently only smooths the positions of control points and not their tangents. End points are also constrained when smoothing.
Mirror
Mode: Edit mode
Hotkey: CtrlM
Menu: Curve » Mirror
The Mirror tool is also available, behaving exactly as with mesh vertices,
Set Bézier Handle Type
Mode: Edit mode
Panel: Curve Tools » Handles
Hotkey: V
Menu: Curve » Control Points » Set Handle Type
This only concerns Bézier curves. As we saw in a previous page, these curves can have four types of handles (giving smooth or angled curve…). ⇧ ShiftH makes all selected control points automatic, H toggles between free and aligned, and V makes them vector. Follow above link for more details.
Extending Curves
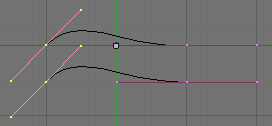
Once a curve is created you can add new segments (in fact, new control points defining new segments…), either by extruding it, or placing new handles with CtrlLMB ![]() clicks. Each new segment is added to one end of the curve. A new segment will only be added if a single vertex, or handle, at one end of the curve is selected. If two or more control points are selected nothing is added (however, if you used the E Extrude command, all selected control points are placed in Grab mode…).
clicks. Each new segment is added to one end of the curve. A new segment will only be added if a single vertex, or handle, at one end of the curve is selected. If two or more control points are selected nothing is added (however, if you used the E Extrude command, all selected control points are placed in Grab mode…).
Note that unlike with meshes, you can’t create a new curve inside the edited object by just CtrlLMB ![]() -clicking with nothing selected – to do so, you can cut an existing curve in two parts (by deleting a segment), copy an existing one (⇧ ShiftD), or add a new one (Add menu)…
-clicking with nothing selected – to do so, you can cut an existing curve in two parts (by deleting a segment), copy an existing one (⇧ ShiftD), or add a new one (Add menu)…
Subdivision
Mode: Edit mode
Panel: Curve Tools (Editing context)
Hotkey: W » 1
Menu: Curve » Segments » Subdivide
Curve subdivision simply subdivides all selected segments by adding one or more control points between the selected segments.
- Number of Cuts
- Subdivides the segment multiple times evenly spacing this number of control points.
Duplication
Mode: Edit mode
Hotkey: ⇧ ShiftD
Menu: Curve » Duplicate
This command duplicates the selected control points, along with the curve segments implicitly selected (if any). The copy is selected and placed in Grab mode, so you can move it to another place.
Joining Curve Segments
Mode: Edit mode
Hotkey: F
Menu: Curve » Make Segment
Two open curves can be combined into one by creating a segment between the two curves. To join two separated use one end control point from each curve. The two curves are joined by a segment to become a single curve.
Additionally, you can close a curve by joining the endpoints
Note that you can only join curves of the same type (i.e. Bézier with Bézier, NURBS with NURBS)
Separating Curves
Mode: Edit mode
Hotkey: P
Menu: Curve » Separate
Curve object that are made of multiple distinct splines can be separated into their own objects. Note, if there is only one spline in a curve object, separating when something is selected will create a new curve object with no control points.
Deleting Elements
Mode: Edit mode
Hotkey: X or Del
Menu: Curve » Delete...
The Erase pop-up menu of curves offers you three options:
- Selected
- This will delete the selected control points, without breaking the curve (i.e. the adjacent points will be directly linked, joined, once the intermediary ones are deleted). Remember that NURBS order cannot be higher than its number of control points, so it might decrease when you delete some control points… Of course, when only one point remains, there is no more visible curve, and when all points are deleted, the curve itself is deleted.
- Segment
- This option is somewhat the opposite to the preceding one, as it will cut the curve, without removing any control point, by erasing one selected segment.
- This option always removes only one segment (the last “selected” one), even when several are in the selection. So to delete all segments in your selection, you’ll have to repetitively use the same erase option…
- All
- As with meshes, this deletes everything in the object!
Opening and Closing a Curve
Mode: Edit mode
Hotkey: AltC
Menu: Curve » Toggle Cyclic
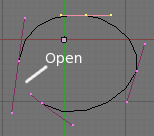
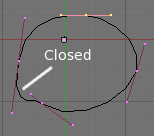
This toggles between an open curve and closed curve (Cyclic). Only curves with at least one selected control point will be closed/open.
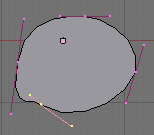
The shape of the closing segment is based on the start and end handles for Bézier curves, and as usual on adjacent control points for NURBS. The only time a handle is adjusted after closing is if the handle is an Auto one. (Open curve) and (Closed curve) is the same Bézier curve open and closed.
This action only works on the original starting control-point or the last control-point added. Deleting a segment(s) dosen’t change how the action applies; it still operates only on the starting and last control-points. This means that AltC may actually join two curves instead of closing a single curve!
Remember that when a 2D curve is closed, it creates a renderable flat face.
Switch Direction
Mode: Edit mode
Hotkey: W » 2 NumPad
Menu: Curve » Segments » Switch Direction, Specials » Switch Direction
This command will “reverse” the direction of any curve with at least one selected element (i.e. start point will begin end one, and vice-versa). Mainly useful when using curve as path, or the bevel and taper options…
Converting Tools
Converting Curve Type
Mode: Edit mode
Panel: Curve Tools1
You can convert splines in a curve object between Bézier, NURBS, any Poly curves.
The Set Spline type button of the Curve group, in the Curve Tools panel, allow you to convert selected splines to the chosen type. Note this is not a “smart” conversion, i.e. Blender do not tries to keep the same shape, nor the same number of control points… For example, when converting a NURBS to a Bézier, each group of three NURBS control points become a unique Bézier one (center point and two handles).
Convert Curve to Mesh
Mode: Object mode
Menu: Object » Convert to
There is also an “external” conversion, from curve to mesh, that only works in Object mode. It transforms a Curve object in a Mesh one, using the curve resolution to create edges and vertices. Note also it keeps the faces and volumes created by closed and extruded curves…
Convert Mesh to Curve
Mode: Object mode
Menu: Object » Convert to
Mesh objects that consist of a series of connected vertices can be converted into curve objects. The resulting curve will be a Poly curve type, but can be converted to have smooth segments as described above.
Curve Parenting
Mode: Edit mode
Hotkey: CtrlP
You can make other selected objects children of one or three control points (CtrlP, as with mesh objects.
Select either 1 or 3 control points, then CtrlRMB ![]() another object and use CtrlP to make a vertex parent.
another object and use CtrlP to make a vertex parent.
Hooks
Mode: Edit mode
Hotkey: H
Menu: curve » control points » hooks
Hooks can be added to control one or more points with other objects.
Set Goal Weight
Mode: Edit mode
Menu: W » Set Goal Weight
- Set Goal Weight
- This sets the “goal weight” of selected control points, which is used when a curve has Soft Body physics, forcing the curve to "stick" to their original positions, based on the weight.
