Doc:2.6/Manual/Animation/Techs/Object/Path
Moving Objects on a Path
To make objects move along a path is a very common animation need. Think of a complex camera traveling, a train on his rails – and most other vehicles can also use “invisible” tracks! –, the links of a bicycle chain, etc. All these movements could obviously be done with standard Ipo curves, but this would be a nightmare! It’s much more easy and intuitive to define a path materializing the desired movement, and make your object(s) follow it.
Blender features you two different constraints to make an object follow a path, which have different ways to determine/animate the position of their owner along their path.
In Blender, any curve object can become a path. A curve becomes a path when its Path Animation button is enabled in the Curve data panel, but you don’t even have to bother about this: once a curve is selected as target for a “path” constraint, it automatically is enabled.
You can also directly add a “path” from the Add » Curve » Path menu entry (in a 3D view). This will insert in your scene a three-dimensional NURBS curve. This is an important point: by default, Blender’s curve are 2 dimensional, i.e. are laid on a plane, which is often not the desired behavior of a path. To turn a standard curve three-dimensional, enable its 3D button, in the same Curve and Surface editing panel.
One last curve property that is important for a path is its direction, which is, for three-dimensional ones, materialized by its small arrows. You can switch it with the Curve » Segments » Switch Direction menu entry (or W2 NumPad).
For more on editing path/curves, see the modeling chapter.
Shapes on Curves
If you would rather like to have your object’s shape follow a path (like e.g. a sheet of paper inside a printer), you should use the Curve Modifier
|
Parenting Method
Older versions of Blender did not have constraints to make an object follow a path. They used a different method (deprecated, but still available), based on parenting.
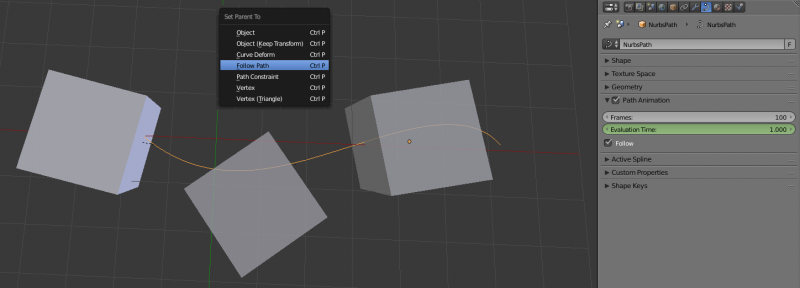
To use this method, select the object that will follow the path, then ⇧ Shift select the curve, and use CtrlP to bring up the parenting menu. Choose Follow Path. The object will now be animated along the path.
The settings for the path animation are in the Path Animation panel of the Curve properties panel.
- Frames
- Defines the number of frames it takes for the object to travel the path.
- Evaluation Time
- Defines current frame of the animation. By default it is linked to the global frame number, but could be keyframed to give more control over the path animation.
- Follow
- Causes the curve path children to rotate along the curvature of the path.
- Radius
- Causes the curve path child to be scaled by the set curve radius. See Curve Extruding
- Offset Children
- Causes the animation to be offset by the curve path child's time offset value, which can be found in its Animation Hacks section of the Object Panel.
The Follow Path Constraint
The Follow Path constraint implements the most “classical” technique. By default, the owner object will walk the whole path only once, starting at frame one, and over 100 frames. You can set a different starting frame in the Offset field of the constraint panel, and change the length (in frames) of the path using its Frames property (Curve and Surface panel).
But you can have a much more precise control over your object’s movement along its path by keyframing or defining a Speed animation curve for the path's Evaluation Time attribute. This curve maps the current frame to a position along the path, from 0.0 (start point) to 1.0 (end point).
For more details and examples, see the Follow Path constraint page.
The Clamp To Constraint
Another method of keeping objects on a path is to use the Clamp To constraint, which implements a more advanced technique. To determine where along the path should lay its owner, its uses the location of this owner along a given axis. So to animate the movement of your owner along its target path, you have to animate some way (Ipo curves or other indirect animation) its location.
This implies that here, the length of the path have no more any effect – and that by default, the object is static somewhere on the path!
For more details and examples, see the Clamp To constraint page.
