Doc:2.6/Manual/Modeling/Curves
Curves
Curves and Surfaces are particular types of Blender Objects. They are expressed by mathematical functions rather than a series of points. Blender offers both Bezier curves and NURBS curves and surfaces. NURBS stands for "Non-Uniform Rational B-Splines". Both Bezier curves and NURBS curves and surfaces are defined in terms of a set of “control points” (or “control vertices”) which define a “control polygon”.
The main advantage to using curves instead of polygonal meshes is that curves are defined by less data and so can produce excellent results using less memory and storage space at modeling time. However, this procedural approach to surfaces can increase demands at render time.
Certain modeling techniques, such as extruding a profile along a path, are possible only using curves. On the other hand, when using curves, vertex-level control is more difficult and if fine control is necessary, mesh editing may be a better modeling option.
Bezier curves are the most commonly used curves for designing letters or logos. They are also widely used in animation, both as paths for objects to move along and as F-curves to change the properties of objects as a function of time.
Tutorials
Create the bird logo with Bezier Curves »
Skinning: Making a surface with two or more curves »
Curve Primitives
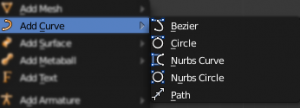
In Object mode, the Add Curve menu, Blender provides five different curve primitives:
- Bezier Curve
- Adds an open 2D Bezier curve with two control points.
- Bezier Circle
- Adds a closed, circle-shaped 2D Bezier curve (made of four control points).
- NURBS Curve
- Adds an open 2D NURBS curve, with four control points, with Uniform knots.
- NURBS Circle
- Adds a closed, circle-shaped 2D NURBS curve (made of eight control points).
- Path
- Adds a NURBS open 3D curve made of five aligned control points, with Endpoint knots and the CurvePath setting enabled.
Bezier Curves
The main elements used in editing Bezier Curves are the Control Points and Handles. A Segment (the actual Curve) is found between two Control Points. In the image below, the Control Points can be found in the middle of the pink line while the Handles comprise the extensions from the Control Point. By default the arrows on the Segment represents the direction and relative speed and direction of movement Objects will have when moving along the curve. This can be altered by defining a custom Speed Ipo.
Editing Bezier Curves
A Bezier curve can be edited by moving the locations of the Control Points and Handles.
- Add a Curve by ⇧ ShiftA to bring up the Add menu, followed by Curve » Bezier.
- Press ⇆ Tab to enter Edit mode.
- Select one of the Control Points and move it around. Use LMB
 to confirm the new location of the Control Point, or use RMB
  to cancel.
 - Now select one of the Handles and move it around. Notice how this changes the curvature of the curve.
To add more Control Points
- Select at least two adjacent Control Points.
- Press W and select Subdivide.
- Optionally, you can press F6 immediately after the subdivision to modify the number of subdivisions.
Note that while in Edit mode you cannot directly select a Segment. To do so, select all of the Control Points that make up the Segment you want to move.
There are four Bezier curve handle types. They can be accessed by pressing V and selecting from the list that appears, or by pressing the appropriate hotkey combination. Handles can be rotated, moved, scaled and shrunk/fattened like any vertex in a mesh.
Additionally, the VT shortcut can be used to toggle between Free and Aligned handle types.
Curve Properties
Curve Properties can be set from the Object Data option in the Properties Header (shown below in blue).
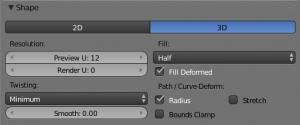
Shape
- 2D and 3D Curves
- By default, new curves are set to be 3D, which means that Control Points can be placed anywhere in 3D space. Curves can also be set to 2D which constrain the Control Points to the Curve's local XY axis.
- Resolution
- The resolution property defines the number of points that are computed between every pair of Control Points. Curves can be made more or less smooth by increasing and decreasing the resolution respectively. The Preview U setting determines the resolution in the 3D viewport while the Render U setting determines the Curve's render resolution. If Render U is set to zero (0), then the Preview U setting is used for both the 3D viewport and render resolution.
- Twisting
- A 3D Curve has Control Points that are not located on the Curve's local XY plane. This gives the Curve a twist which can affect the Curve normals. You can alter how the twist of the Curve is calculated by choosing from Minimum, Tangent and Z-Up options from the drop-down menu.
- Fill
- Fill determines the way a Curve is displayed when it is Beveled (see below for details on Beveling). When set to Half (the default) the Curve is displayed as half a cylinder. The Fill Deformed option allows you to indicate whether the Curve should be filled before or after (default) applying any Shape Keys or Modifiers.
- Path/Curve-Deform
- These options are primarily utilized when using a Curve as a Path or when using the Curve Deform property. The Radius, Stretch and Bounds Clamp options control how Objects use the Curve and are dealt with in more detail in the appropriate links below.
Read more about Basic Curve Editing »
Read more about Paths »
Read more about Curve Deform »
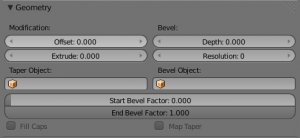
Geometry
- Modification
- Offset
- By default, text Objects are treated as curves. The Offset option will alter the space between letters.
- Extrude
- Will extrude the curve along both the positive and negative local Z axes.
- Bevel
- Depth
- Changes the size of the bevel
- Resolution
- Alters the smoothness of the bevel
- Taper Object
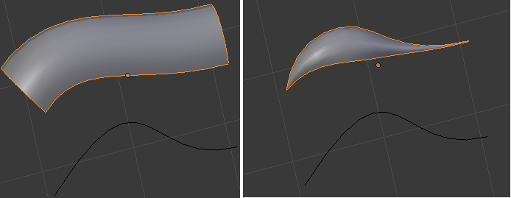
- Tapering a Curve causes it to get thinner towards one end. You can also alter the proportions of the Taper throughout the tapered object by moving/scaling/rotating the Control Points of the Taper Object. The Taper Object can only be another Curve. Editing the Handles and Control Points of the Taper Object will cause the original Object to change shape.
- Bevel Object
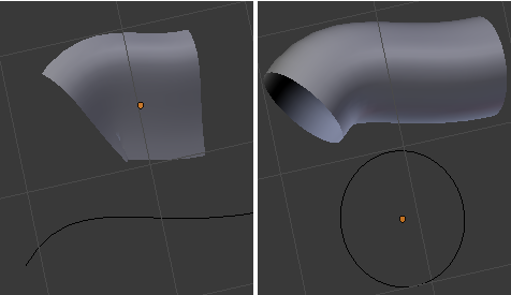
- Beveling a Bezier Curve with a Bezier Curve as the Bevel Object generally gives it the appearance of a plane, while using a Bezier Circle as the Bevel Object will give it the appearance of a cylinder. The Bevel Object can only be another Curve. Editing the Handles and Control Points of the Bevel Object will cause the original Object to change shape. Given the options available, it is best to experiment and see the results of this operation.
- Fill Caps
- Seals the ends of a beveled Curve.
- Map Taper
- For Curves using a Taper Object and with modifications to the Start/End Bevel Factor the Map Taper option will apply the taper to the beveled part of the Curve (not the whole Curve).
- Start Bevel Factor and End Bevel Factor
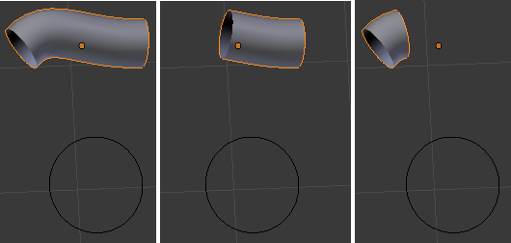
- These options determine where to start the Bevel operation on the Curve being beveled. Increasing the Start Bevel Factor to 0.5 will start beveling the Curve 50% of the distance from the start of the Curve (in effect shortening the Curve). Decreasing the End Bevel Factor by 0.25 will start beveling the Curve 25% of the distance from the end of the Curve (again, shortening the Curve).
Read more about Advanced Curve Editing »
Path Animation
The Path Animation settings can be used to determine how Objects move along a certain path. See the link below for further information.
Read more about utilizing Curves for paths during animation »
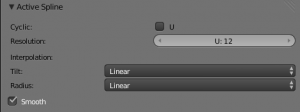
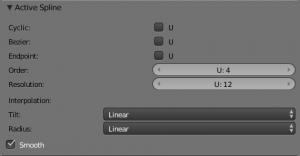
Active Spline
The Active Spline panel becomes available during Edit mode.
- Cyclic
- Closes the Curve.
- Resolution
- Alters the smoothness of of each segment by changing the number of subdivisions.
- Interpolation
- Tilt
- Alters how the tilt of a segment is calculated.
- Radius
- Alters how the radius of a Beveled Curve is calculated. The effects are easier to see after Shrinking/Fattening a control point AltS.
- Smooth
- Smooths the normals of the Curve
Non-Uniform Rational B-Splines (NURBS)
One of the major differences between Bezier Objects and NURBS Objects is that Bezier Curves are approximations. For example, a Bezier circle is an approximation of a circle, whereas a NURBS circle is an exact circle. NURBS theory can be a very complicated topic. For an introduction, please consult the Wikipedia page. In practice, many of the Bezier curve operations discussed above apply to NURBS curves in the same manner. The following text will concentrate only on those aspects that are unique to NURBS curves.
Editing NURBS Curves
A NURBS Curve is edited by moving the location of the Control Points.
- Place a Curve by ⇧ ShiftA to bring up the Add menu, followed by Curve » NURBS curve.
- Press ⇆ Tab to enter Edit mode.
- Select one of the Control Points and move it around. Use LMB
 to confirm the new location of the Control Point, or use RMB
  to cancel.
 - If you want to add additional Control Points, select both of them, press W and select Subdivide. Press F6 immediately after to determine how many subdivisions to make.
Active Spline
One of the characteristics of a NURBS object is the knot vector. This is a sequence of numbers used to determine the influence of the control points on the curve. While you cannot edit the knot vectors directly, you can influence them through the Endpoint and Bezier options in the Active Spline panel. Note that the Endpoint and Bezier settings only apply to open NURBS curves.
- Cyclic
- Makes the NURBS curve cyclic.
- Bezier
- Makes the NURBS curve act like a Bezier curve.
- Endpoint
- Makes the curve contact the end control points. Cyclic must be disabled for this option to work.
- Order
- The order of the NURBS curve determines the area of influence of the control points over the curve. Higher order values means that a single control point has a greater influence over a greater relative proportion of the curve. The valid range of Order values is 2-6 depending on the number of control points present in the curve.
Path
As mentioned above, Curves are often used as paths. Any curve can be used as a Path if the Path Animation option is selected.
The Path option available from the Add Curve menu is identical to a 3D NURBS curve, except that you do not have access to the Active Spline panel.
