Doc:2.6/Manual/3D interaction/Navigating
Page status (reviewing guidelines)
Text
|
Introduction
The 3D View is where you perform most of the object modeling and scene creation. Blender has a wide array of tools and options to support you in efficiently working with your mouse, keyboard and keypad.
It is also the oldest, and therefore most feature- and option-rich area of Blender. However, there's no need to be intimidated. Just take it slow and experiment with a few options at a time to see what they do.
3D Window Header
The 3D View window is comprised of a workspace and a header. The header is shown at the bottom or top of the workspace, and can be hidden if desired. The header shows you a menu and the current mode, as explained below.
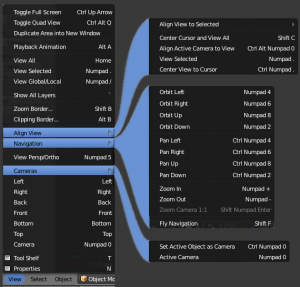
View Menu
- Properties Panel
- Toggles the Properties side panel (N), which allows you to tweak many 3D view settings:
- Tool Shelf
- Toggles the Tool Shelf (T), which appears on the left side of the 3d view, and allows you to perform various operations, depending on the type of object selected, and the mode you are in.
- Camera (0 NumPad)
- Switches the view to the current camera view.
- Viewing angles
- These commands change the view to the default Top/Bottom, Front/Back, or Left/Right views.
- Top (7 NumPad)
- Bottom (Ctrl7 NumPad)
- Front (1 NumPad)
- Back (Ctrl1 NumPad)
- Right (3 NumPad)
- Left (Ctrl3 NumPad)
- Cameras Menu
- Set Active object as camera
- Active camera
- Perspective/Orthographic View(5 NumPad)
- These commands change the projection of the 3D view
- Navigation Menu
- This sub-menu contains commands for rotating and panning the view. Using these commands through the menu is not that efficient. However, like all Blender menus, the much more convenient keyboard shortcuts are listed next to the commands.
- Align View
- This submenu allows you to align the 3D view in certain ways.
- Align to selected
- Center cursor and view all
- Align active camera to view
- View Selected
- Center View to cursor
- Clipping Border... (AltB)
- Allows you to define a clipping border to limit the 3D view display to a portion of 3D space.
- Zoom Border... (⇧ ShiftB)
- Allows you to define the area you want to zoom into.
- Show all Layers (~)
- Makes all of the display layers visible.
- Global View/Local View (/ NumPad)
- Global view shows all of the 3D objects in the scene. Local view only displays the selected objects. This helps if there are many objects in the scene, that may be in the way. Accidentally pressing / NumPad can happen rather often if you’re new to Blender, so if a bunch of the objects in your scene seem to have mysteriously vanished, try turning off local view.
- View Selected (. NumPad)
- Zooms the 3D view to encompass all the selected objects.
- View All (↖ Home)
- Zooms the 3D view to encompass all the objects in the current scene.
- Play Back Animation (AltA)
- Plays back the animation from the current frame.
- Duplicate area in new window
- Clones the current 3D view in a new window
- Quad View
- Toggles a four pane 3D view, each showing a different angle of the scene.
- Toggle Full Screen(Ctrl↑)
- Maximizes the 3D View window to fill the full screen area.
Select Menu
This menu contains tools for selecting objects.
Object Menu
This menu appears when in Object Mode. In edit mode, it will change to the appropriate menu with editing tools.
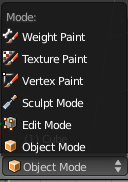
Mode List
Blender has several modes of operation.
- Object mode allows you to work with objects as a whole.
- Edit mode by allows you to modify the shape of the object.
- Sculpt mode
- In this mode your cursor becomes a tool to shape the object
The cursor becomes a brush in:
- Vertex Paint mode
- Weight Paint mode
- Texture Paint mode.
ViewPort Shading List
Allows you to change the way 3D objects are displayed in the viewport.
- Bounding Box
- Wireframe
- Solid
- Texture
- Material
- Rendered (only for Cycles renderer)
Read more about 3D view options »
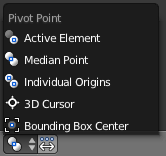
Pivot Point Selector
When rotating or scaling an object or group of vertices/edges/faces, you may want to shift the pivot point (the transformation center) in 3D space. Using this selector, you can change the pivot point to the location of the:
- Active Element
- Median Point - the average center spot of the selected items
- Individual Origins
- 3D Cursor
- Bounding Box Center
Use the Object Center to switch between transforming the entire objects, or just the position of the objects
Read more about Pivot Points »
Transform (Manipulator) Selectors
These handy selectors allow you to rotate or move objects by grabbing (clicking with your mouse) their controls and moving your mouse in the axis.
Read more about Transform Manipulators »
Layer Selector
Layers are well documented in the Layers page. Toggling layer visibility is covered in the section on viewing layers and moving objects between layers is also discussed in this page.
Lock to Scene
By default, the “lock” button to the right of the layer buttons is enabled. This means that in this view, the active layers and camera are those of the whole scene (and those used at render time). Hence, all 3D views locked this way will share the same active layers and camera – when you change them in one view, all locked others will immediately reflect these changes.
But if you disable this “lock” button, you then can specify different active layers and camera, specific to this view. This might be useful if you don’t want to have your working areas (views) cluttered with the whole scene, and still have an ancillary complete view (which is unlocked with e.g. all layers shown…). Or to have several views with different active cameras. Remember that you can use (Ctrl0 NumPad to make the active object the active camera.
Snap to Mesh
This “magnet” button controls the snapping tools that help with transforming and modeling objects.
Render Buttons
The Render Buttons render an OpenGL version of the 3D view.
The first button renders a still image of the Objects in the 3D view without displaying the grid, axes, etc. It uses the same Draw mode as the 3D view, so it’s rather useful if someone asks to see the wireframe of an Object you’re working on.
The second button will render an animation of the 3D View, making it useful for making preview renders of animations. The animation will be saved in the folder and format specified in the Output panel of the Render context.


