Doc:2.6/Manual/Animation/Techs/Shape/Indirect Animation
Indirect Shape Animation
As usual, indirect shape animation is how to animate an object’s shape (often a mesh) by animating other “controlling” objects. With object’s shapes, in Blender, this mainly goes through modifiers (in fact, you may call it “modifier animation”…).
You may already know some classical techniques, like lattice and hooks deformations – well, they are now modifiers in Blender! But you can also use others, like e.g. the boolean one…
Note also that the “physical simulations” (i.e. particle systems, softbodies/clothes, fluids…) are indeed modifiers! Follow the links to learn more on these tools. In addition to their “traditional” animation (through F-curves controlling some of the parameters of the simulation), you can also influence their results by animating other objects (obstacles/inflows/outflows for fluidsims, force fields and “collisioners” for particles/softbodies/clothes…).
Once again, one of the main indirect shape animation/deformation tool, armatures (aka skeletons or rigs), are tackled in the next page.
The possibilities are nearly unlimited! Read the relevant chapters (mainly the modifiers and physical simulations ones, where you will also often find some examples), and let your imagination work for you…
Animating with Lattice Example
A lattice is a framework of controlling vertices (a sort of special mesh, always forming a 3D square grid). Associating a mesh to a lattice is a nice way to apply deformations to the mesh while modeling, but it is also a way to make animated deformations in time! To deform the mesh, you can deform its “parent” lattice – a mesh always manage to “fit inside” its lattice.
Mesh as deforming cage
There is also a modifier, Mesh Deform, which allows you to use any mesh as a sort of “lattice” (i.e. as a deforming cage for another mesh)…
|
You can deform a Lattice in animations in mainly three ways:
- Directly animate the lattice vertices with shape keys.
- Indirectly animate the lattice vertices with modifiers (so you can have modifiers modifying modifiers!).
- Move the deformed object through the lattice over time.
The first technique is basically nothing new than what contained in the about shape key pages, but applied to a lattice which deforms an object. With the third kind, you can create animations that squish things between rollers, or achieve the effect of a well-known space ship accelerating to warp-speed. As the object enters the lattice, it starts to deform. As it emerges, it expands like a foam rubber ducky back to its original shape.
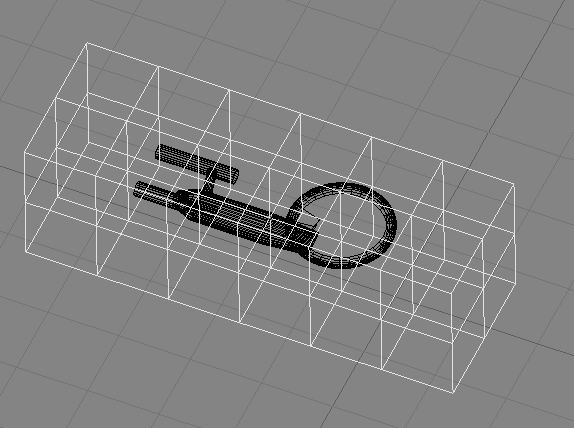
For example, make a “space ship” mesh object. Add a lattice around the ship. Make the lattice with the parameters shown to Lattice panel in Object Data of Properties window for selected the lattice:
- U: «7»
- V: «3»
- W: «3».
There are two ways to make the lattice deform the spaceship, but you should always use the modern, “modifier” one: select the object to be deformed by the lattice, and create a Lattice modifier, entering the name of the lattice in the Object field of the modifier panel. Note that:
- You can further control which vertices are affected by the lattice with a vertex group (enter its name in the Vertex Group text field).
- You can deform a lattice with another lattice (this might be handy in some very special cases…).
- You can also use the Lattice modifier to deform curves/surfaces/texts.
- The old, deprecated method to use a lattice was to make the object to be deformed a child of this lattice, through a special parent relationship.
You should not see any deformation of the ship right now, because the lattice is still regular.
For the next few steps it is important to do them in Edit mode. Select the lattice, enter Edit mode, and select all vertices (A). Scale the lattice along its X axis (press X once the scale is initiated), to get the stretch you want. The ship’s mesh shows immediately the deformation caused by the lattice (Stretching).
Now edit the lattice in Edit mode so that the right vertices have an increasing distance from each other. This will increase the stretch as the ship goes into the lattice. The right ends vertices I have scaled down so that they are nearly at one point. This will cause the vanishing of the ship at the end (Final lattice deformation).
Select the ship again and move it through the lattice to get a preview of the animation. Now you can do a normal (“object”) keyframes and F-curves animation to let the ship fly through the lattice.
Implications for Camera Tracking
With this lattice animation, you can’t use the center point of the object as tracking or parenting target, since the vertices that make up the mesh are sucked into the lattice or spit out, way off center from the object itself. When that happens, although the camera is looking at the mesh object’s center, the mesh isn’t there so the camera is looking in the wrong place. Instead, track an empty which has a mesh’s vertex as parent.
To do this, add an Empty. Make sure this empty is selected, select the mesh object, and enter Edit mode (⇆ Tab). Select one vertex from the mesh object, and press CtrlP to make the vertex the parent of the empty. Get out of Edit mode.
Now tell the camera to track to the empty (using a Track To constraint). Animate the location of the empty (this will be relatively to the parent vertex), to lead the object as it enters the lattice, and lag as it emerges (or vice versa if your lattice squashes the mesh). As the mesh enters the lattice and deforms, the empty will lead/lag its center, keeping the camera looking at the deformation action.
Add some halos and a flash of light (an animated lamp) at the end, and you have something like that shown above.


